- Home ›
- Watercolour dog portraits ›
- A colourful watercolour dog portrait
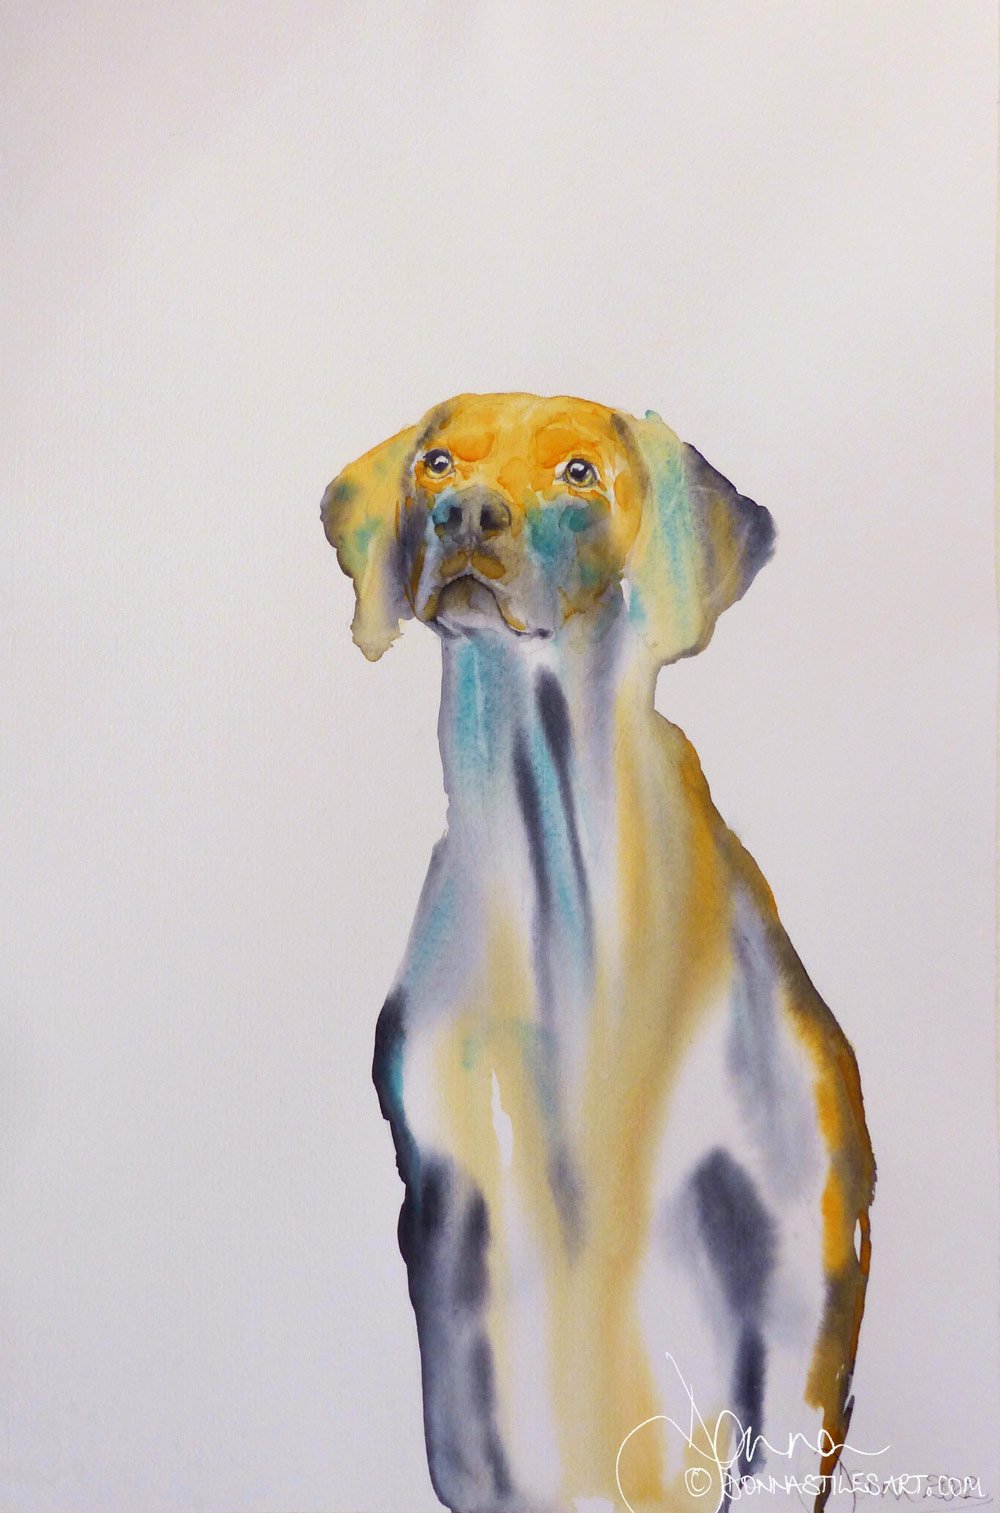
Colourful watercolour dog portrait -
a short-haired Weimaraner
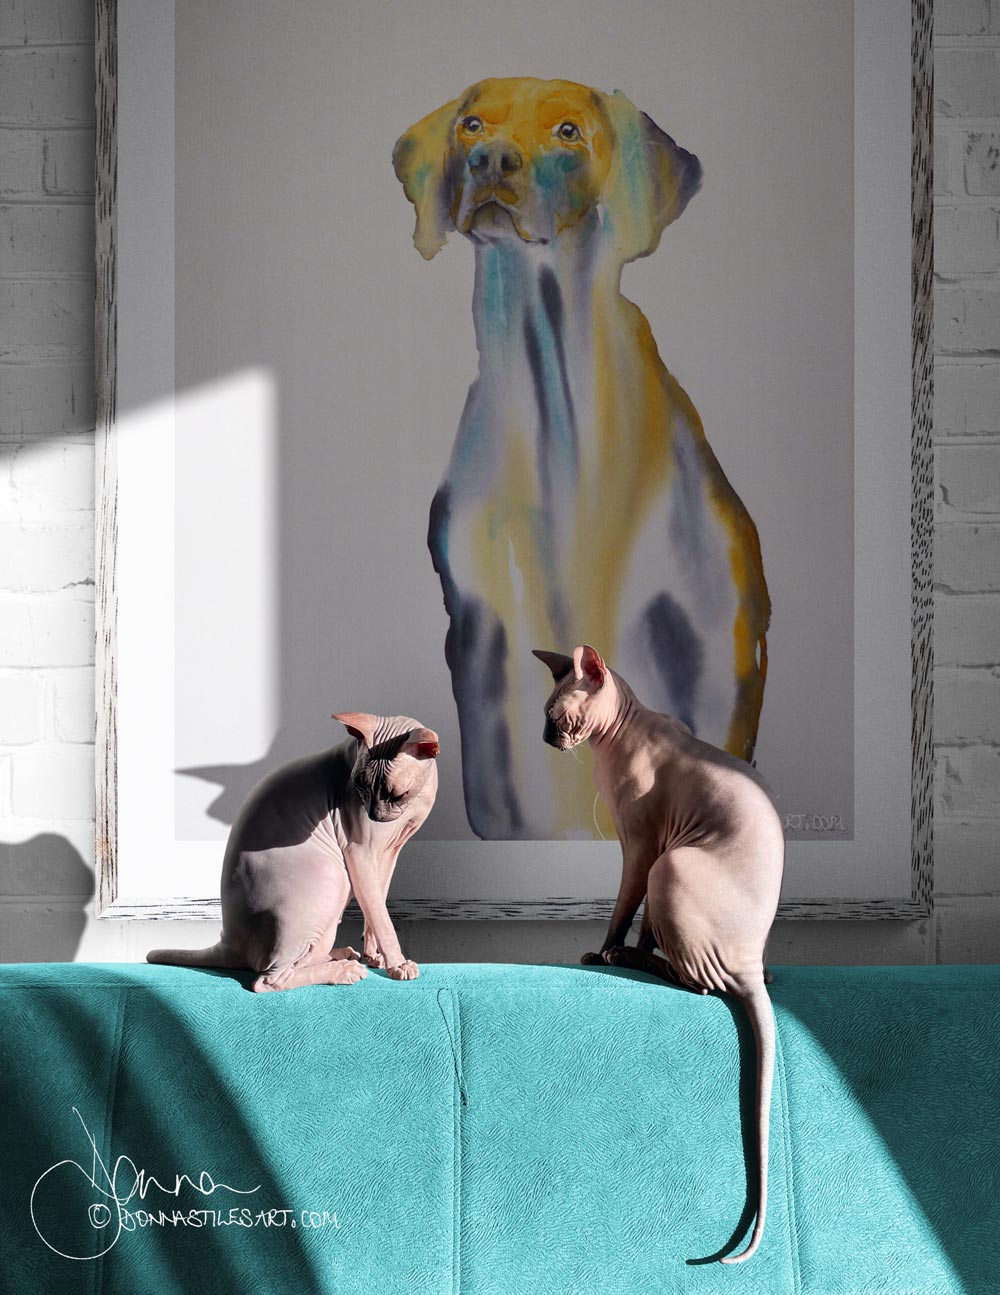
Not one, but two colourful watercolour dog portraits of a short-haired Weimaraner.
I have been teaching my students to use colours that aren't those of the subject. To paint boldly with brushes laden with water and pigment. To let the colours mix on their own on the paper. And, last week, to paint wet into wet, without fiddling!
For this week's lesson I wanted to take things a big step step further and to get them to paint the first and important wash in a very loose style. In fact, they would need to give up on having any real control. Because there would be a rule! Their brushes could only be used to touch the colour onto the wet paper. Not to mix or direct the pigments. For that they could only use gravity and water. I can be mean sometimes!
And we were going to paint a dog :)
To give them the best chance of concentrating on the technique rather than worrying about depicting all the hair, I wanted a dog that didn't have lots of fluff. And I found him.
This gorgeous short-haired Weimaraner. With a look that was just crying out to be painted.
The photo
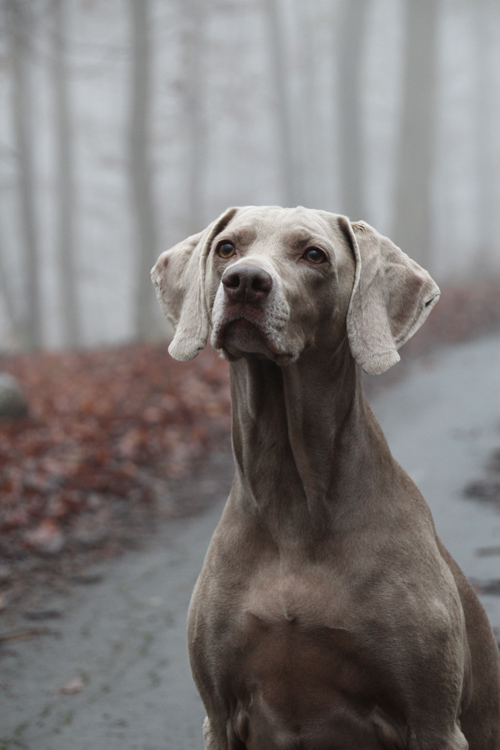
If you'd like to paint this lovely Weimaraner, you can find the original photograph that I used by kind courtesy of photographer Ron Muller on the www.Unsplash.com website - link here.
And this was my preparation play at painting him.
My preparation paintings give me insights into how to best structure and simplify my class demonstration and lesson. In this instance, I knew that I wanted to change the watercolour paper I was going to use - for a different textural effect - and to reduce the number of layers to, if possible, just two.
How to paint a colourful watercolour dog portrait - the class demonstration
Step one: choosing the colours
Choosing colours that work well together, that produce the textural effects you want, and give your subject the mood that you want to convey, is the most time consuming part of any watercolour painting.
TIP
The more preparation and thinking you do before you start to paint in watercolour, the freer you can be to experience the sheer joy of painting in this medium. And the better the outcome will be.
This is especially true of painting in watercolour in a loose style. Although it may not seem it, a loose style watercolour painting requires even more pre planning in order to be successful.
And in this case, as we were going to be painting the first wash of the dog's body with practically zero control over how the pigments mixed together, it was vital that each of the colours we used mixed with each of the others without producing mud!
My local weekly watercolour class is a two hour class and as I want to give that time over to as much painting as possible, I usually pre choose the colours we will be using.
This time I chose a limited palette of just three colours: Permanent Orange, Cobalt Turquoise Light and Payne's Grey. Details below.
Step two: wet into wet
1. To give my students more time in which to play with adding the colours whilst painting the first layer and to obviate the possibility of hard edges forming, with the exception of his eyes, this time I first wet all of his body and head with a brush laden with clean water.
Wet the paper with a brush or a spray bottle?
The advantage of using a brush from the outset is the accuracy in which you can paint with water.
You could also use a spray bottle to wet the paper but the downside of doing so is that you will need to be sure to completely dry his eyes and around his body before starting to paint.
Depending on the amount of water you have sprayed, your paper, and the room temperature/humidity, you may find that by the time you have carefully dried any unwanted wet areas, the water will have been absorbed by the paper and you will need to do it all over again.
And. There is always the risk that what looks dry really isn't. One of the fundamental rules of watercolour is that the water - with or without pigment in it - will always travel from a wetter area to a less wet area. Even if that less wet area is only slightly damp.
Which means that if you have a damp patch breaching the outline of the body, when you add the pigments wet into wet, they will find their way into it.
2. Held my board between 45 degrees and vertical.
3. Then touched in, wet into wet, the pure watercolour pigments. Being careful to thoroughly clean my brush in clean water after each time I touched the paper so that the pure colours mixed on the paper and not in my brush.
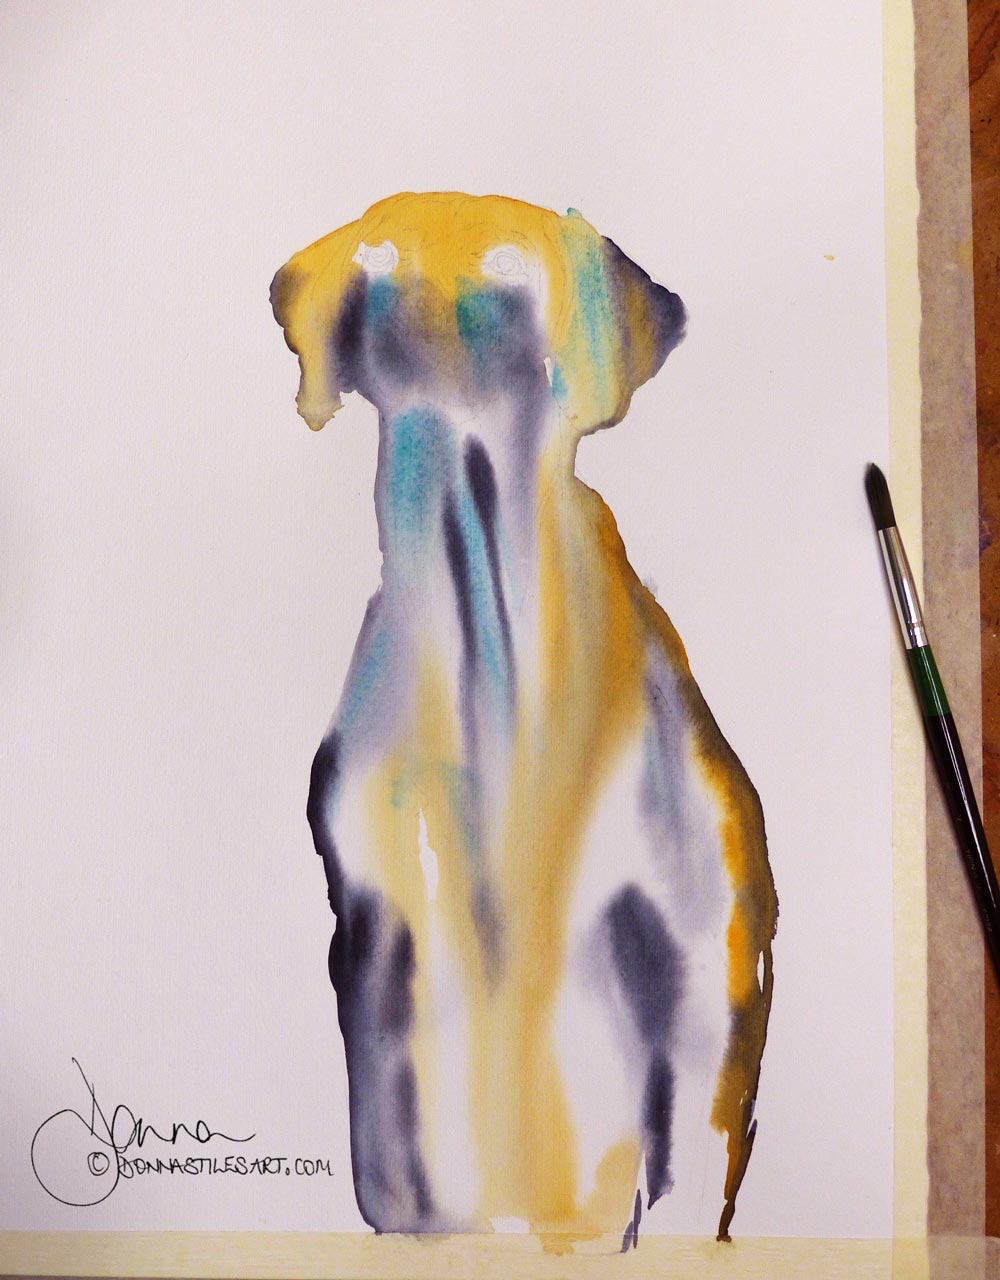
The brush needs to be laden with lots of pigment - a creamy consistency - as the water already on the paper will dilute it as it travels down the paper.
4. And let the water, pigments and paper do the rest!
5. When the water and pigments had reached the bottom of the painting and I didn't want to add any more, I placed the board flat on the table. Mopped up any excess water/pigments at the bottom (to prevent watercolour cauliflowers), and let him dry.
Now he just needed his face :)
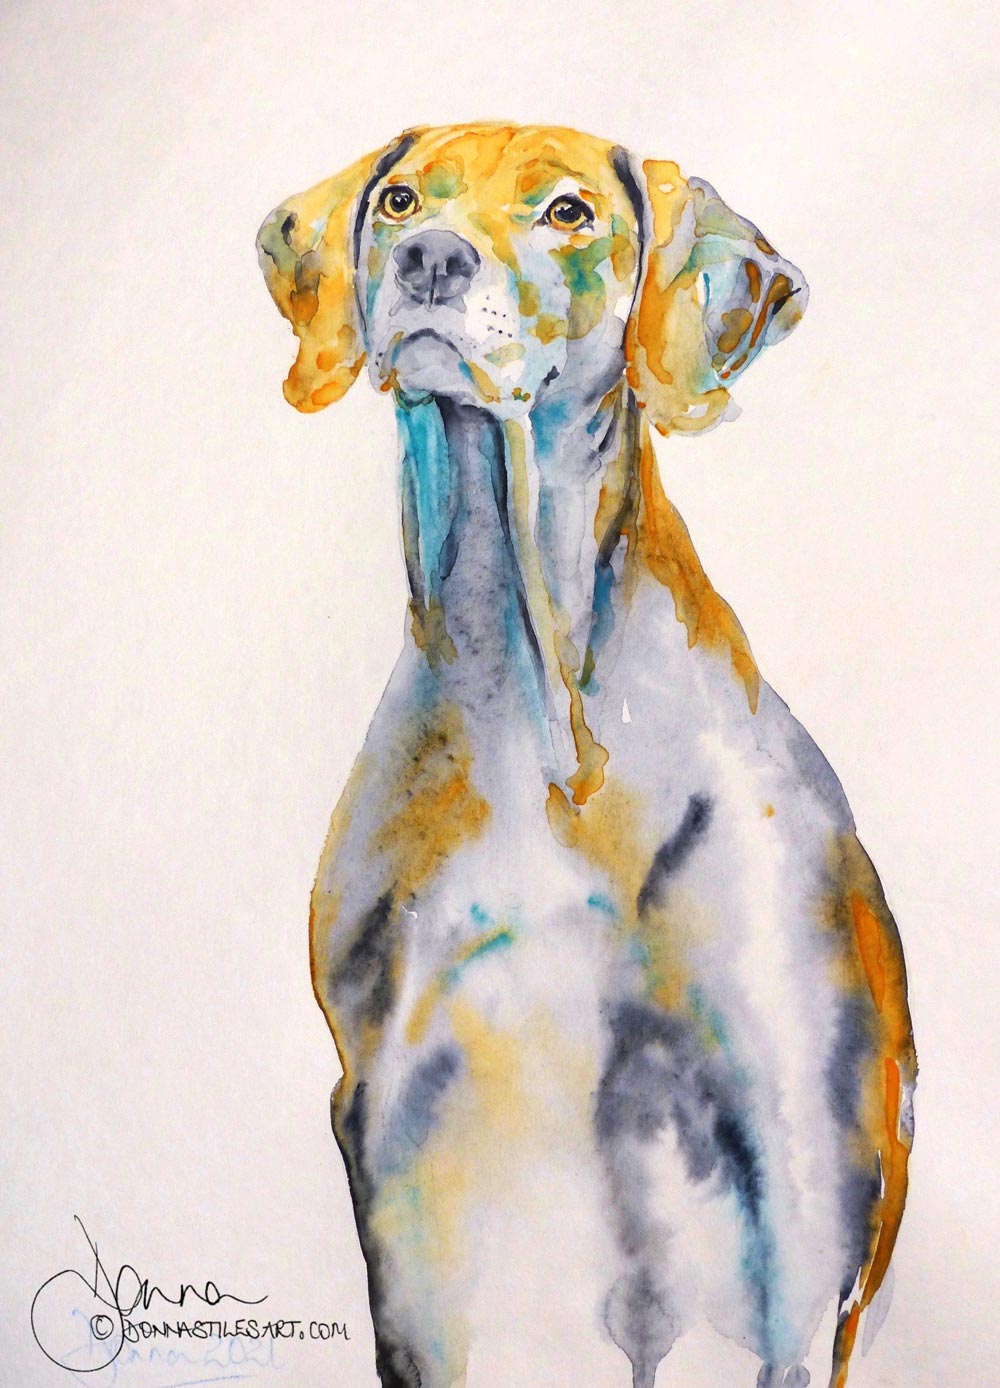
Step three: wet on dry
1. With dilute layers, so as not to loose the beauty of the first wash beneath, and only where absolutely necessary, I increased the depth of tone in places to give three dimensional form to his face and define his facial features.
2. Then, added the darkest darks for his eyes and nostrils. And he was finished.
The addition of any more would risk making his head look as though it didn't belong to his body. His face would become disproportionately heavier in tonal value. The underlying connection of the first wash would be lost. And each additional brush stroke would add new hard edges. All in stark contrast to the soft edges and flowing form of his body.
So, I stopped there.
Besides, there was no need to paint anymore: he was already talking to me!
The watercolour materials I used
The product links in this page are "affiliate links". If you click on them and make a purchase, I may earn a small commission at no cost to you. I only recommend products that I use myself and have no doubt that you will love too. More information can be found in my disclosure policy.
Watercolour pigments
- Royal Talens Van Gogh Permanent Orange and Payne's Grey;
- and Winsor and Newton Cobalt Turquoise Light.
Watercolour paper
Fabriano 5 50% 300 gm²/140 lbs watercolour paper.
Watercolour brushes
The brush I used for the first wet wash was my go to favourite, a da Vinci Petit Gris Mix 5590 size 12 that holds copious amounts of water and pigment. Wouldn't ever want to be without it!
And for the subsequent layers on the head etc, a cheap synthetic round brush.
Plus a Royal Talens Van Gogh No.5 selected filament brush that is perfect for painting fine details with lots of control. It comes free! with the superb Van Gogh watercolour set that I recommend to my watercolour students.
More of my watercolour dog portraits.
Starting out in watercolour and want to paint captivating portraits?
Sign-up for my latest tips, secrets, and terrific tutorials to get you through the disappointing phase faster and painting the portraits you want to.