- Home ›
- Watercolour tips for beginners
Watercolour tips for beginners
Watercolour tips for beginners. The do's and don'ts and lightening bolt moments I've learnt along my watercolour journey that will give you the watercolour painting results you want. Faster. Whether you want to paint portraits, landscapes, or still life.
Some will be easier to follow or stick to than others. I still have to sometimes force myself not to do some things because the temptation to do so is so strong! If you were a fly on the wall in one of my watercolour classes, you'll hear me lightheartedly admonishing my students and to do something or not to so many times during our sessions that we all end up laughing!
If you only take away two tips from this list, these first two will have the most impact on improving your watercolour paintings.
You're going to need to use water!
I am reminded of the the old saying, "it does what it says on the tin": it's not called watercolour for nothing!
This medium was made for water and you are going to need to use lots of it!

Most of my students happen to come to me after they have mastered acrylics and oils, which I have found hinders them for quite some time. Their restraint in using generous amounts of water means that at first they practically paint dry.
I have to forcefully get them to to fill their brushes with water. Often holding their hands whilst I dip their brushes deep into their water container and then refuse to let them dry the whole thing off on a towel before they touch their paper
Those of my students who have never painted in acrylics or oils don't have the same hesitation and will often use too much water. But thats a good thing as it is so much easier to learn to use less than to force yourself to break a well ingrained practice.
Those gorgeous pigments in your palette need to play in water to express themselves and do their magic
Use a bigger brush
An immediate way to improve your watercolour painting and to help with using enough water is to use at least a size bigger brush than the one you are comfortable using.
Go on! It won't bite!
Then when you have painted for a while with that one and have become comfortable with it... guess! Go up another size!
More about brushes here.
DON'T FIDDLE!
Don't fiddle! It's the easiest of things to say and the one over the years of teaching my watercolour classes I have repeated more than most, but it is the most difficult thing not to do in watercolour. And the result of doing so is the hardest and as often as not impossible thing to rectify.
Watercolour's vibrancy, light, luminosity and delicacy depend on leaving it alone as much as possible. Touching it as least times as possible. Letting the magic happen.
Those naturally beautiful effects that occur in front of your eyes and the incredible delicate transitions of colours that result when the paper is dry, won't happen if you fiddle.
But resisting the urge to just touch an area one more time.
To try and improve something when it is best left well alone, at least until it is dry.
To remove something and not wait but re-paint over the same area whilst the paper is still damp...
All of those things and more take time to stop doing. For our hands to not respond to the urge in our head! Especially for those who also paint in oil or acrylic. Because with those mediums, mistakes can easily be remedied with a fresh new layer of paint. With watercolour they can't.
The maximum two rule
Sometimes, in order to force my students to stop fiddling, I have begun a class with a rule - no matter what the subject for the lesson was - that they can only touch the paper with their brushes a maximum of once or twice for any given part of the painting. That soon leads to some fun and laughter and me taking brushes away!
Seriously, it will take time, but if you can learn to recognise when you are about to re-touch an area fiddle with something that you don't like the look of, and not do it. It will make a huge impact on the beauty of your watercolour paintings. Try the maximum two rule!
Time spent playing isn't wasted time
Time spent playing with colours, getting to know them and how they interact. Which pigments like to dance the rumba and which a waltz. Which ones once they touch the paper, sit still and won't budge. Just like a toddler with a tantrum! And which ones run as fast as they can out of the gates.
Which ones you can remove when they dry and which ones stain the paper and nothing, but nothing, will get you back the white of your paper.
Which ones when applied as the very first layer will give your finished painting a glow. And which when glazed on top at the end will enable you to subtly warm up or cool down areas.
None of this is lost time. On the contrary, it's essential. And it's fun!

Use both sides of your watercolour paper to experiment with swatches of colours. Mixing just two together at first, and then a third into the first and second. Then all three together.
Often as not when using three colours, you will need to be careful as to the order in which you I paint with them because the chances of you having elements of all three primaries present is much greater. And all three can make mud.
For example colour 1 might mix wonderfully with colour 2 and colour 3 to form two new vibrant colours, but colour 3 makes mud with colour 2. Which means that you will either need to avoid mixing 2 and 3 together altogether.
Or, to use all three in a part of your painting, the order that you add them one on top of the other, will need to be colour 2 down first, then colour 1, then colour 3.
It's only by spending time experimenting before you start painting that you will know what works and what you want to avoid.
The endless beauty of a limited palette
If you've just bought and unwrapped your watercolours for the first time and those gems are staring back at you crying out to be tried, this piece of advice might seem like a damp squid on your plans. But, trust me, it will make a huge difference to the outcome of your paintings. That doesn't mean don't go playing with all of those colours, you must!
But you don't need to use all or the majority of the colours in your palette to produce a stunning painting. In fact using a limited palette of just two, or three, or four colours will produce a much more harmonious and successful painting than one that has every colour under the sun in it.
The best way of getting to know which limited colour combinations are the most visually pleasing to you: the colours that make your heart sing when you paint with them. Which combinations match your subject and express you the mood you want to convey. Is by playing, trying combinations used by different watercolour artists, and experimenting by putting together even the oddest of possibilities.
But that takes time and if you are like me and sometimes when you have some time free to yourself you really just want to get down to painting, here are some of my own favourite combinations for you to try.
Two colour combinations
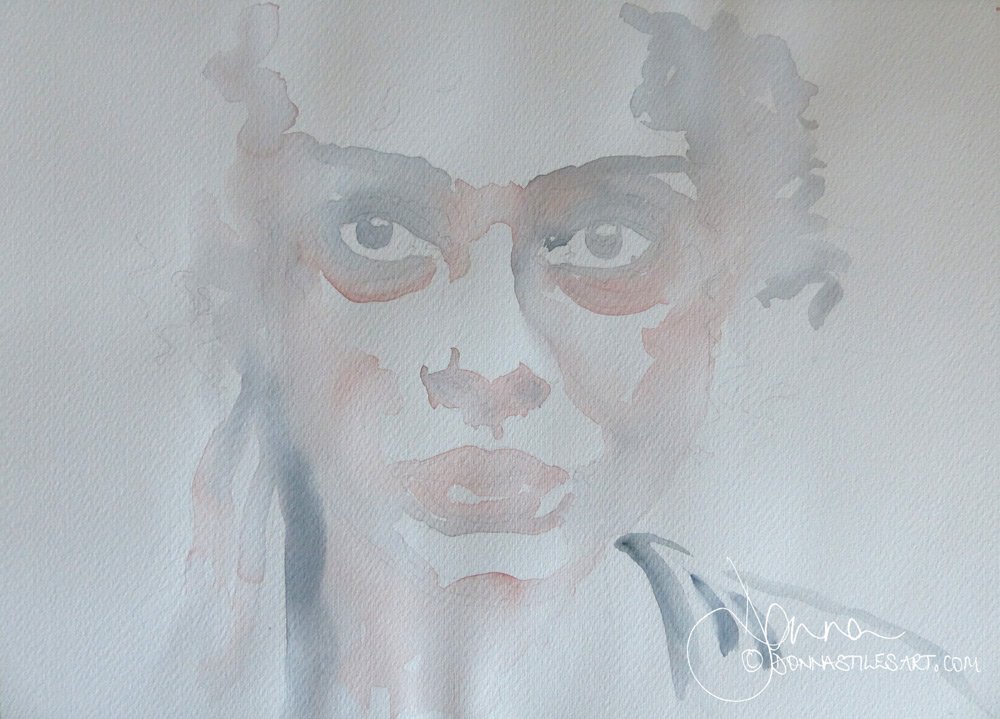
One of my favourite limited palette portrait combinations is without a doubt, Sepia from the Van Gogh range by Royal Talens with Madder Brown by Schminke.
And the same Madder Brown with Payne's Grey (similarly from the Van Gogh by Royal Talen's range.)
Three and four limited watercolour palette combinations
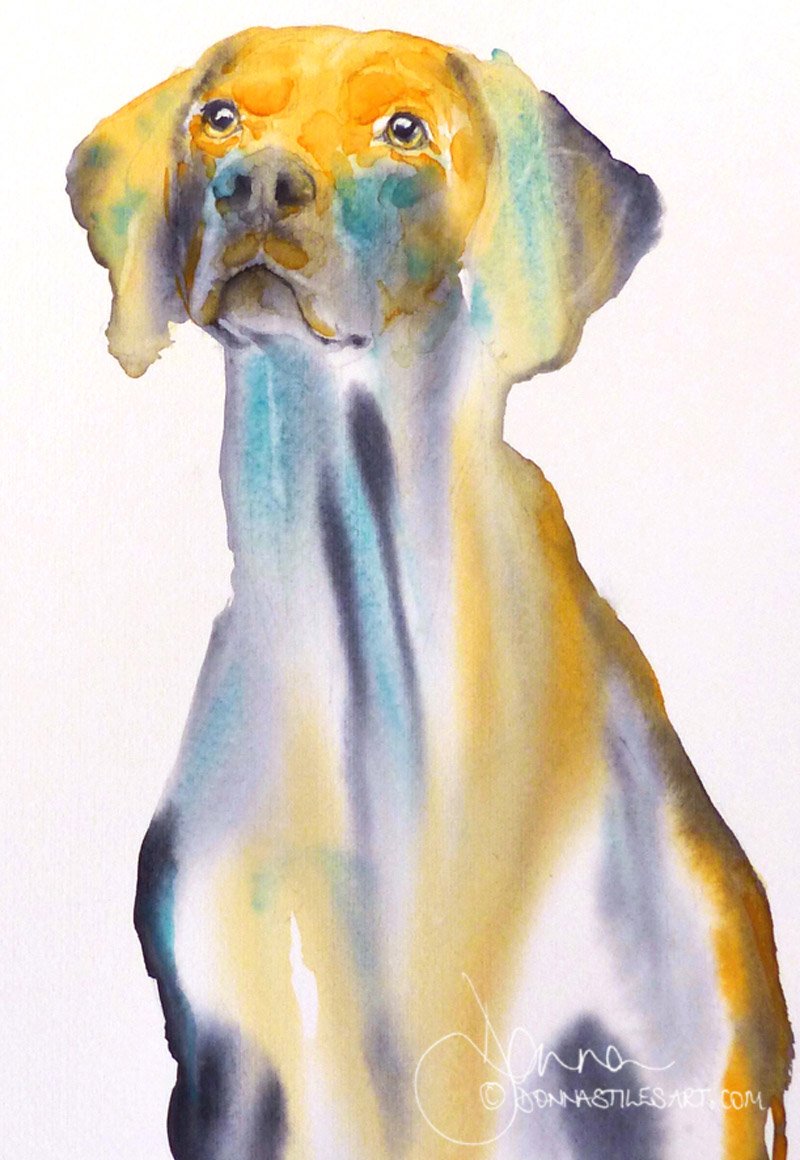
1. The regal Weimaraner dog portrait above was painted with three colours: Permanent Orange, Cobalt Turquoise Light, and Payne's Grey.
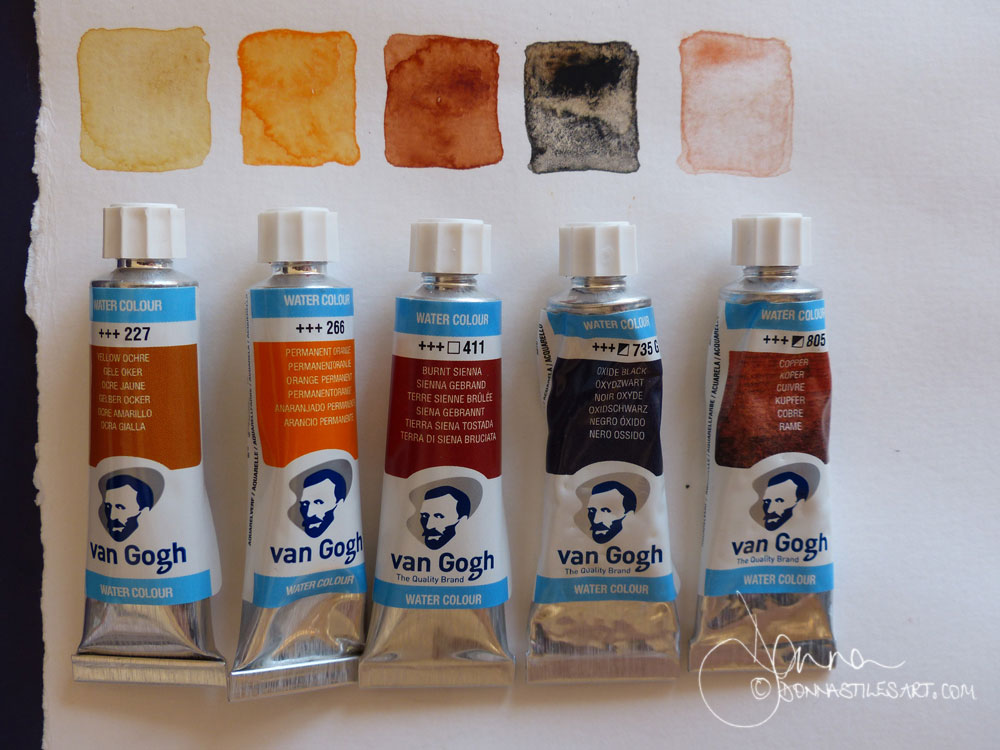
2. Yellow Ochre, Permanent Orange, Burnt Sienna, Oxide Black, and metallic Copper. I know! I said four maximum, but the Copper in this combination gives such a fine shimmering iridescence that I'm allowed to squeeze it in for a very special fox.
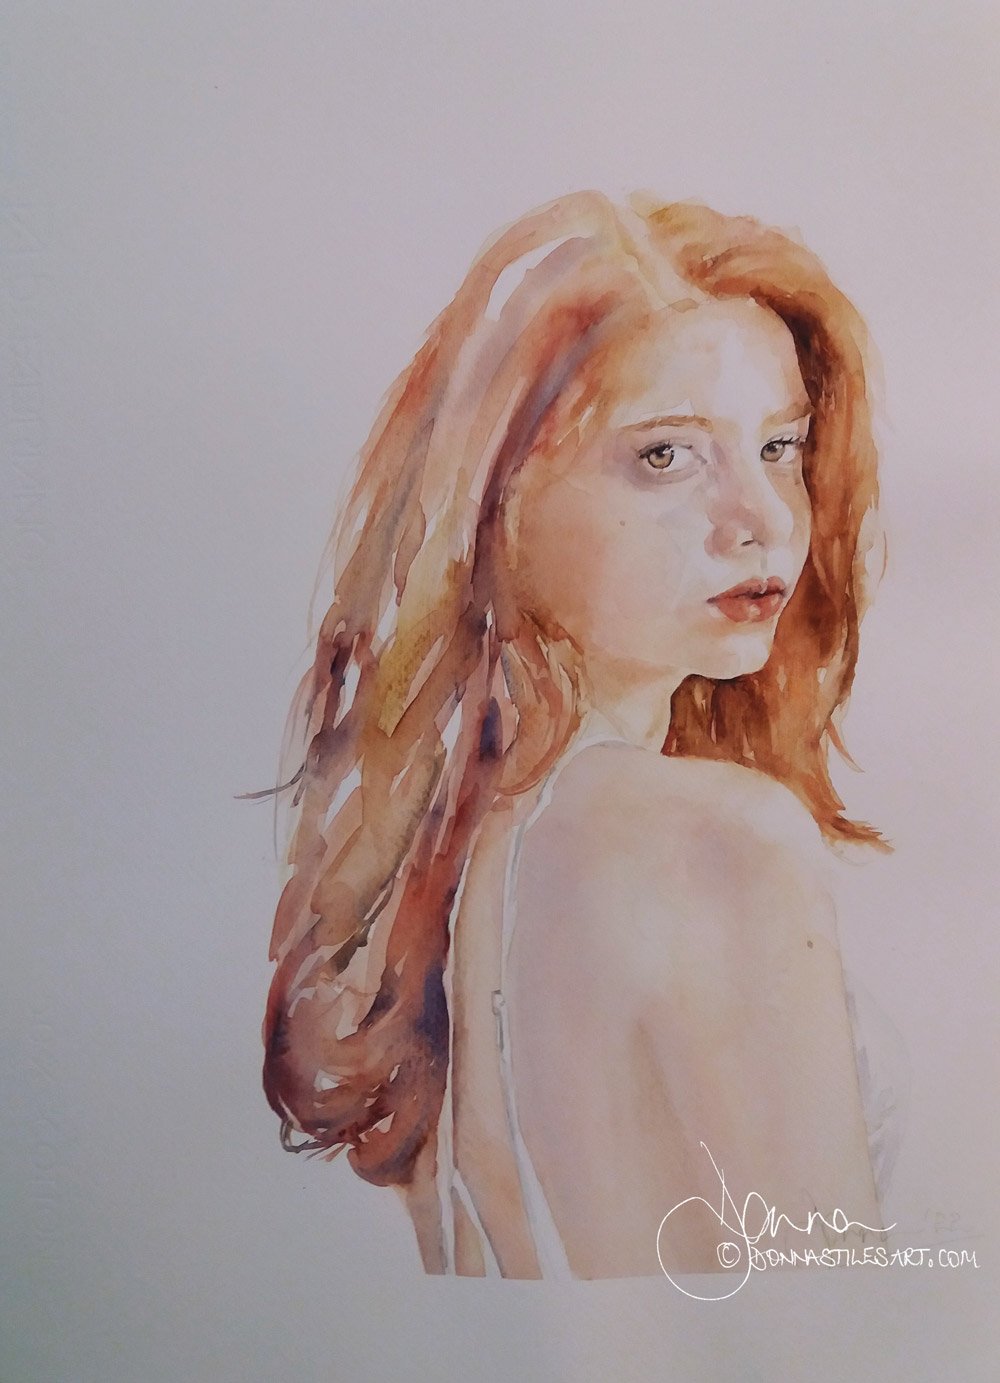
3. Yellow Ochre, Burnt Sienna, Madder Brown, and Ultramarine blue with some Copper highlights for this watercolour portrait of a woman with red hair.
4. And a combination I come back to again and again and never fails to delight me is Yellow Ochre, Burnt Sienna, Prussian blue and Windsor Violet.
Decide on the colours you are going to use at the beginning - put all the other colours away
Once you have played a little and found the colour combinations that you want to use in your painting - this can take me a whole day or even two sometimes - don't be tempted to add in extra colours as your painting progresses.
Adding in a new colour late in the day will give a discordant result: things won't look like they hang together. Which, in turn, can so easily lead to over working to try to resolve the problem.
It also increases your risk of making mud as you may not have tested the new addition with your existing palette before.
When I'm painting with watercolour pigments in pans, I lift the ones I'm going to be using out of their palette and put them on an old white ceramic plate. Then I put that palette away.
If you are are using tube paints, try squeezing the amounts you need of each colour out onto a clean plate. And hide the rest!
How to mix watercolours -
the most beautiful colours aren't the ones you mix
The most beautiful colours aren't the ones you mix.
They are the ones the water and pigments make on their own. Subtle shifts of colour that are arts of work in their own right.
I have even been known to cut out a tiny section from a larger painting and have it framed because it is so very beautiful.
Which leads me to tell you, don't throw away the paintings you don't like. Not immediately anyway. Look at them every know and then and you may find that you can turn a part of it into an altogether different painting.
Mix your watercolours on the paper
Mix your colours directly on the paper not in your palette.
Doing so will give you more beautiful colour shifts and subtle transitions, rather than one uniform, potentially, flat colour.
Mixing on palette versus mixing on paper
As an example, take a look at the what happens when two colours, Quinacridone rose and Ultramarine deep, are mixed on the palette versus when they are mixed one into the other on the paper.
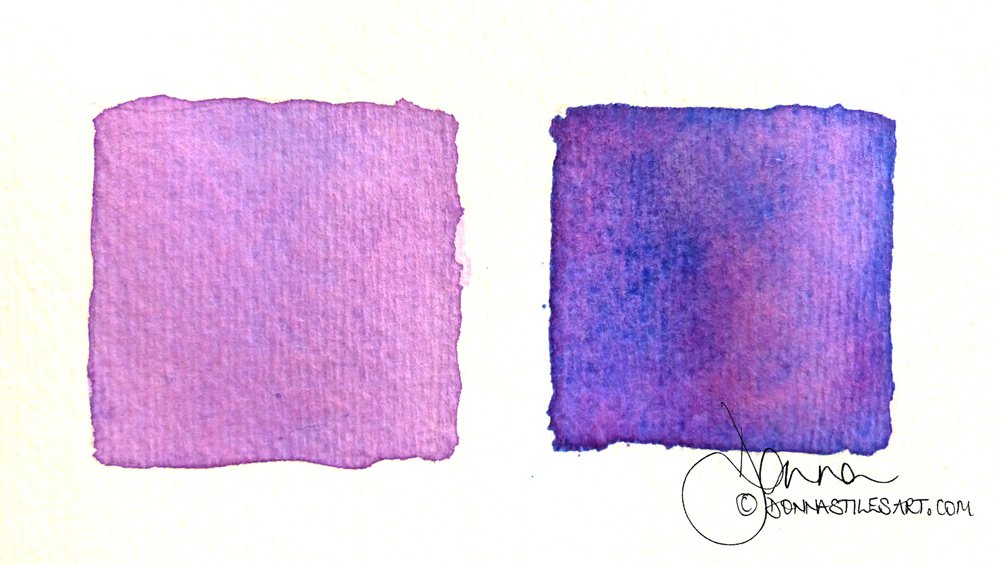
The square on the left was painted with the two colours first mixed together in my palette. For the one on the right, I first painted a layer of Ultramarine deep and then added to it the Quinacridone rose.
TRUST the water to do beautiful things, better than you ever could
Trust the water to do beautiful things. Better than you ever could!
When you put colour and water down on the paper try and be decisive and then breathe. Allow space before touching the painting again for the pigments to move, to interact. For the water to take the tiny particles down into the paper.
Watercolour isn't an immediate painting technique like acrylic or oils. What is put down by the brush isn't the end of the matter! And what you see when you put colour to paper isn't what you will see when it is dry.
The components of water, pigment and paper need time to do their magic: watch what happens and if you like it, let it be :)
Less is more
The more watercolour layers you add to a painting the less light will be able to be reflected form the surface of your paper through the pigment particles. The duller the painting will become.
There is an exception to that, but not for beginners. You can apply 40 or more layers without blocking all the light - there are watercolour artists who do and very successfully - but they need to be very thin transparent layers. Applied very delicately and carefully one on top of the other only after each has fully dried.
Try to complete your painting in just two layers: mingling colours in a wet first wash and then a second layer to add the mid and dark tones.
Use the least amount of strokes as possible
This tip continues the "less is more" advice.
The more times you touch your watercolour paper when painting the more you will dislodge the natural sedimentation of the minute particles of your watercolour pigments. Loosing their natural layering and granulation on the paper.
The result is less interesting, less vibrant, flatter, more muted colors. Similar to having mixed the pigments together on your palette.
AND. The more times you touch the more you are likely to end up mixing combinations of colours that contain elements of all three primary colours and make watercolour mud!
Try not to go over an area again when you are putting a wash layer down. Use a really juicy brush full of water and pigment.
Use the right size of brush for the area that you are going to cover: you can't paint a sky with a size 0 brush! Remember that bigger brush I mentioned at the beginning?
Using too small a brush or too dry a brush to cover an area will result in streaky lines: the pigment will start to settle into the paper and the paper will will start to dry out before you have finished painting the whole section.
Pull, don't push
If you want to expand an area of colour you have placed on your paper, try to avoid using your brush to "push" it into place. Instead, invite the watercolour pigments to travel to where you want them to be.
With a clean brush, paint water into the new area alongside the colour already painted, leaving a small gap between the two. Spread the water out with your brush until the quantity of water on the paper is less than or equal to the quantity of water in the area already painted.
Then, with your brush, invite the pigments to flow into the new wet area by joining the water area into the painted area with your brush along the gap.
The water in and on your paper will always flow from areas of greater quantity to areas of less.
If the quantity of water in/one the paper where you first painted is greater than the quantity of water in/on the new area, the pigments will flow further into the new area.
If the quantities of water are the same on both sides, the pigments will move a little way into the new area. This is, in fact the technique for "softening out" an edge or area whilst the painting is still wet. See my watercolour techniques for beginners for all of the techniques and effects you will ever need.
The saving grace of a folded tissue
1. The point of a single layer of tissue dipped very gently onto a pool of water and pigment will absorb the excess water.
2. The fine tip of a folded tissue can be placed into the smallest of areas eg the pupil of an eye, to absorb excess pigment or water quickly.
You can use a damp clean brush - natural fibre or a synthetic equivalent to natural hair (cheap synthetic brushes wont do this well ) is best - to do this too, but that tissue to hand is always a quicker solution than wetting a brush, getting most of the water out of it and then applying it to lift the water. Plus, the temptation once you've got that brush in your hand is fiddle some more!
3. Use a tissue to wipe around the masking tape of your painting when the first wash is done to pick up any excess water and so prevent back runs forming.
Even that micro fine line of water that beads along the inside of your masking tape WILL cause a back run to form. So when you are wiping the masking tape dry, let the tissue very carefully touch where the external edge of the painting and the tape meet, to mop that bead up.
How to control the amount of water in your brush
A folded tissue is also the perfect tool for having complete control over the amount of water in your brush.
If you aren't sure how juicy it is, first touch it onto a spare piece of paper to see the stroke it makes. Over time, you won't need to do this as you will instinctively know when you need to reduce the water content before using it.
But that doesn't necessarily mean that you want to reduce the amount of pigment in your brush: in fact nearly all of the time you don't.
And thats where that tissue comes in. By touching the heel of the brush with the side of a folded tissue, the water in the brush will move into it. But, because the majority of the pigment is usually concentrated in the upper part of the brush, you won't loose much pigment with the water that is removed.
EVERY watercolour painting goes through an ugly duckling stage
Practically every watercolour painting goes through an ugly duckling stage: I find that it is usually about the time I am mid way through adding a second layer.
In the early days I would look at what I had done and admonish myself for ruining what was as often as not a perfectly fine and beautiful first wash. I'd even stop altogether and go and tell my family that I was no good and had ruined another painting.
But when I had made a mug of coffee and stopped taking the whole thing too seriously, I'd go back - resist the want to rip the thing up! - and continue what I had set out to do. It was through pushing through that ugly phase that I learnt that I just needed to trust the process. That it would pass and that ugly duckling - sometimes! - would turn into a beautiful swan, or goose or duck!
Now, a few years later, I recognise when that stage has arrived, acknowledge it, but carry straight on. If I stop at that point and come back to the painting a day or so later I am know that I will be so much less keen to pick it up again or finish what I have started.
So, don't give up too readily when things start not to look like you wanted them too. It might just turn out to be your best painting yet!
16. If in doubt, chicken out!
If in doubt, don't do it!
That's it! If you are feeling hesitant about doing something. Not sure if you should. Don't know what to do next.... Then stop your hand from getting anywhere near the paper and don't do a thing!
Step back. Think it through. Leave it for a while.
Going backwards in watercolour isn't easy. It's not always impossible, but the transparency and vibrancy of the colours and the whiteness of the paper will 99% of the time be compromised.
STOP! Before it's too late...
When you think your painting is just about finished. Or, when you start to tell yourself, "I'll just do this..."
DON"T.
STOP!
Throw your water away. Put your paints in a place where they aren't easily reached. Together with your brushes.
And WALK AWAY!
Go with the happy accidents
Try not to take it all too seriously - have some fun!
Happy accidents will happen with watercolour and often as not they will drive you to expressing an, "Oh nooo!", when they appear in front of you. But, again, as often as not, when everything is dry, they don't look half as terrible and add something unexpected but wonderful to be incorporated within your next layer. Or, left completely alone.
As artists, we see all of our "mistakes": they stare straight back at us. But when other people see our work, they don't. Those happy accidents will, in all probability, have them asking you how you did it!
But if you really can't stand them, then I've got you covered on how to correct - most of - them. How to fix those pesky watercolour mistakes.
Drying your watercolour with a hairdryer
First up, if you don't have to dry your painting quickly, don't. The primary reason being is that, as I've said before, the pigments, paper and water need time to do their magic.
Drying with a hairdryer not only freezes that happening, which can lead to a flatter less vibrant looking painting with less life in it. The tiny particles in the organic pigments won't have had time to settle at various levels within the paper. They will largely remain all on its surface.
And. If you are drying an area that hasn't absorbed all the water, ie. there are still pools of water or areas with a a glossy sheen, then the force of the air from the dryer will push that water in the direction of the air flow, taking the pigments in it with it. Sometimes if there is enough surface water and your dryer is on full, right across the paper!
Which also means that those pigments will dry concentrated in the last drop of water as that dries. Which may mean that you will have to lift some of that colour out later.
Using a hairdryer also tends to lead to buckled paper, much more than if you had left the painting to dry slowly.
But that said, if you do need to, try and wait for as long as you can before doing so. Until the paper has absorbed the water.
Always start the dryer at the wettest area of the painting with the aim of reaching a point as quickly as possible where the remaining water content across the painting or area you have painted is even. Then dry the whole painting/area evenly.
This will help prevent blossoms/blooms or watercolour cauliflowers forming. These pesky blighters are quick and will start to grow in the time it takes you to go get and plug in your hairdryer! But they are beautiful too :)
And last, but not least
Be kind to yourself. Comparison kills creativity
Look through your Instagram feed. Follow your favorite artists on Facebook. Get a feel for what excites you: the colours they have used, the mood, the subject.
But. Then. Because I know it will happen, it does to me every single time. When you start to get that feeling of,
- you are so far behind, you'll never catch up,
- you'll never be that good,
- that they have already nailed it,
- there's no room for you,
- it'll take too long to get where they are,
- they post incredible paintings every day, you only manage one a month...
Turn the Social Media OFF.
It's healthy and great to take inspiration. To find out what it is that excites you to paint. But the low that comes with comparing yourself to the artists you follow and admire will only kill your creativity.
Be kind to yourself.
The truth is the only difference between you and them is that they started their watercolour journey before you.
Don't throw out your early paintings
Don't throw out all of your early paintings, even if you don't like them much. Keep a selection. Because, six months/a year from now when you take them out of your draw or folder and look back, YOU will see how far you have come and it will give you the encouragement you need to keep going.
You will see that the techniques that didn't give you the results you wanted at first are now second nature. That the mud you used to make, you don't anymore.
More watercolour tips for beginners...
Top tips for watercolour portraits
Achieve the results you want with these fundamental beginner tips for watercolour portraits.
Including, should beginners paint watercolour portraits?
All things watercolour paper
The chalk and cheese of watercolour paper for beginners: not all watercolour papers are equal.
A good paper will dramatically improve your watercolour paintings AND prevent a lot of the problems that you may be experiencing. You will literally be able to see and feel the difference whilst you are painting.
1. You'll find my recommendations on the best watercolour paper for beginners here.
2. How to flatten those bumps and buckles in your watercolour paper.
3. How to tear your sheets of watercolour paper without ending up with a rip you don't want!
Coming next in watercolour tips for beginners...
How to fix those pesky watercolour mistakes
Most of the time, nothing is as bad as it seems.
I've got a whole page full of how to fix those pesky watercolour mistakes - as they happen and when everything is dry - in how to correct watercolour mistakes.
Best watercolour supplies for beginners
You're going to need some great watercolour supplies that don't cost the earth. You'll find my recommendations here - in watercolour painting materials for beginners.
Watercolour techniques for beginners
My 101 of easy watercolour techniques for beginners that takes the mystery out of all of the terminology with step by step explanations of everything.
Plus fun watercolour effects that will have you experimenting and decorating things you didn't intend to: don't wear your best t-shirt!
Starting out in watercolour and want to paint captivating portraits?
Sign-up for my latest tips, secrets, and terrific tutorials to get you through the disappointing phase faster and painting the portraits you want to.